Showing posts with label Tim Holtz. Show all posts

Wednesday, February 6, 2013

MB - Intricate Heart

This is a card I shared over on the Outside the Box blog.  That's the blog featuring designs from the Memory Box design team.

I wanted to share a few more details over here on how this card was designed.   I am a huge fan of anything Tim Holtz and frequently choose the Distress line of products when designing my cards.

Instructions:

  • I cut a piece of Tim Holtz Idea-ology Tissue paper to about 4 1/2 X 5 1/2 and using a "dries clear" liquid glue, I glued it to a piece of Memory Box paper in Parchment to 3 7/8" X 5 1/8".  I actually used Ranger Ink's Glue 'n' Seal.  Love that product.   Once dry, I trimmed off the excess tissue paper and then distressed with Brushed Corduroy Distress Ink using an ink blending tool and foam.
  • This piece was adhered to Memory Box Licorice paper (5 1/4" X 4") and then adhered to a Memory Box Pool Note Card.
  • I cut a piece of Connection Paper from the Fourteen Collection by Crate Paper  and adhered it to a piece of MB Licorice paper
  • I stamped the Memory Box Intricate Heart using Versamark Ink onto a piece of MB Parchment Paper and heat embossed with Judi-kins Opaque White embossing powder. My new fav!!  {smile}
  • I distressed the image with Victorian Velvet Distress Ink using a blending tool and foam.  Then I layered on Worn Lipstick Distress Ink and finished up with some Fired Brick Distress Ink to add some depth and shadowing.
  • Here's a neat tip.  Take a tissue and moisten it with your breath (I know...sounds and LOOKS strange)....then buff the heart.  This removes any excess ink from the embossed area and really makes it pop.
  • Die cut the heart using the Memory Box Grand Heart die.   I then used a finger dauber and put a just a hint of Black Soot Distress Ink around the edges of the heart.  This just added a bit of shadowing and I like the effect.
  • I attached this to the front of the card.
  • Thread twine through a button and tie in back, then fold ribbon in half and tie with remaining twine.  Use large glue dot to adhere to front of card.
I hope you like the card. Have a great day!

Linda

Sunday, January 13, 2013

Journal for Lou

Today I want to share a journal that I made for a very very dear friend and co-worker, Lou.  She is so special to me.  We've worked together for 12 years and I couldn't ask for a better friend and confidant.  I absolutely love how this journal turned out and I secretly wanted to keep it for myself...is that bad???!  {wink}.


Some of the product is probably older and no longer available (like the paper) but I'm going to list it here just so ya know....

The journal size is 5 X 8 and I assembled it using a Zutter Bind-it-All.  The covers are just plain thick chipboard and covered with Bo-Bunny paper.  It's Unwritten from the Gabrielle Collection.  It was perfect for the front of the journal.  The design on the front of the cover is actually how the paper was designed!  PERFECTION!

The verse is from Stamper's Anonymous.  It's actually a wood stamp designed by Tim Holtz that I've had for a while. They issued it as part of one of Tim Holtz's unmounted stamp collections called Just Thoughts.

I added a bit of Tim Holtz film strip tape on the left side.  The little jars are also Tim Holtz corked vials.  I found some clear pebbles and dyed them with Copic refills.  Glued in the little corks and added a bit of twine.  Just too precious.

The roses, of course, are my absolute favorite part of the journal and I just love making them.  They are made from Tim Holtz Idea-ology Grunge Paper and Tim's Tattered Florals Sizzix die (the medium sized 6 petal flower).  I just stamped the pieces with a background stamp and covered them with Distress Ink using a Blending Tool and Foam.  Then assembled the flowers. The leaves are actually die cut from My Favorite Things but I can't recall which die.  {shame}  

The last thing I did was add a bit of Stickles to the rose petals....and let them dry before adding them to the front of the journal.

The inside of the journal is just plain kraft text weight paper.

Thanks for stopping by today.  Hope you like my journal.

Linda

Thursday, September 20, 2012

Hardware Journal

Another journal today...I feel bad that I can't remember who I gave this one to??!!  But it was a year ago and I'm much older today.  Pretty sure it was Trish.

Anyways...I like the simplicity of this journal.

I used a paper from the Splendid Collection from Athentique.  I really like the heavy weight of their papers.  They work great for journal covers.

I punched a border using EK Success Abstract Flower Edger Punch for the left spine and then covered it with Tim Holtz Tissue Tape in Symphony.  The pearl/jewels on the lower right are from Prima as are the black jewels behind the rose.

The book plate and knob are also both Tim Holtz Idea-ology.  Remember...I'm addicted to all this hardware.  :)

Finally, I made the rose by hand by punching out three 5-petal flowers from grunge paper.  I inked them up with Fired Brick Distress Ink and stamped them with a background image.  I then cut and formed them into this 3-dimensional rose!   I absolutely love it!

For some glitz, I added Rock Candy Distress Stickles to the flower and the petals (also cut from Grunge Paper).

thanks for stopping by today!

Linda

Tuesday, May 1, 2012

Dogwood in Spring

Today I'm featuring the Flowering Branches stamp from Memory Box.  It reminds me of a dogwood tree.  It's sentimental since my mom has always loved them.
Pin It

I'm also featuring the Gothic Rosette 98249 die.  I know, I know...its supposed to be a rosette, but I also love it as a border die!
Instructions:
  • Cut a 4 X 5 1/4 mat from Vanilla Bean paper
  • Stamp Mail Definitions G1839 with brown dye ink onto kraft cardstock and adhere to top of Vanilla Bean mat
  • Die cut Gothic Rosette from Bauble cardstock (from the Valise Collection) and adhere about 3/4" below the Mail Definitions
  • Cut a piece of scrap ribbon and adhere between these two pieces then attach this entire piece to the front of a Sky Note Card
  • Stamp Flowering Branches with Brilliance Pearlescent Chocolate ink onto cold-press watercolor paper and heat emboss with clear embossing powder.  Trim around outside stamped edge
  • Watercolor flowers with Tim Holtz Worn Lipstick Distress Marker using water brush
  • Distress with Shabby Shutters and Stormy Sky Distress Inks and blending tool/foam and attach to Vanilla Bean mat and then Sky mat and attach to front of card with foam tape
  • Stamp Just a Note Combo B1852 with brown dye ink and attach to Sky mat and then attach to front of card
Enjoy this beautiful day!
Linda

Wednesday, March 28, 2012

Journal for Cindy

It’s time for another journal.   This journal was made for my friend and co-worker, Cindy.  Cindy is a blast to be around.  She has a wonderful smile and an infectious laugh.  When we were working together on a huge project at work, she kept me in stitches.

When I set out to create a journal for her, I channeled her whimsy and fun side and this is what I came up with. So, this one is a little whimsical and a little grungy.  Not that Cindy is grungy….just the journal is.  {smile}

Whimsical Journal

 Pin It

The journal was first covered with 12 X 12 paper called Produce from the Farmhouse Collection by Crate Paper….one of my favorite companies.  I used the same paper (front and back) to layer into a collage.  

I used a technique from Tim Holtz for the pinwheel.  First a cut a scalloped circle from Raspberry Gingham paper from Memory Box.  I then took Tim Holtz tissue tape and ruffled it behind the circle.  I die cut another decorative circle using the Lace Circle die by Memory Box from a piece of Pool paper also from Memory Box.  Then layered on a flower, another circle and a decorative brad.

The “pointing finger” is a stamp designed by my friend, Wendy Vecchi and stamped onto Grunge Paper.

I topped it all off with a double bow I tied from some May Arts ribbon!

This was definitely one of my favorites.

my blog signature

Thursday, March 15, 2012

Kim’s Journal

Hi, everyone!

Time to feature another journal.   When you look at this one, you’re going to think the colors are a bit subdued.   That’s for a reason.  This journal I designed for my friend and former co-worker, Kim.   If you’ll recall from a previous blog entry, I designed 12 journals for some co-workers, including Kim.  As I designed each one, I tried to tailor it to the person.

Kim has such a warm spirit about her.  She loves nature and is so kind and loving.  Just one of those people who brings joy to other’s lives.

She chose to retire at the beginning of the year and I miss her and her smile.  I hope you can see the beauty in this journal just as we see the beauty in Kim.Birdcage Journal
Pin It

For the life of me, I can't remember what company the paper is made by.    At the spine, I added Tissue Tape and Film Strip Ribbon from Tim Holtz Idea-ology Line.  The tag is an inventory tag that I crumpled and then distressed with Distress Inks from Ranger.   I dyed the seam binding ribbon with Distress Inks as well.

The bird cage and bird are die cut using Tim Holtz Caged Bird Die by Sizzix.  The chain and jump rings are also from Tim Holtz from his Idea-ology line.  I think the beads are from Maya Road.  They were clear and I just added Ranger Alcohol Inks to match them to the journal colors.

Hope you enjoy!  Talk to you soon!

Linda

Monday, February 27, 2012

Journal for Lisa

Time for another journal.    This is one I made for my friend, Lisa.   She's a dancer and is hilarious.  Very expressive and fun.  Just a joy to be around.

The journal is a bit subdued, I suppose, but I love the quote I found to put on it.  No idea who to credit it to.  It seems a bit blurred in the picture.  It says "Beauty without expression is boring."

I really like the way this one turned out.  Simple, but elegant.
Pin It

The curio knob looks like its off center, but it isn't.   I'm anal...remember.   It just looks that way in the photo.

I painted the wood hanging plaque in Brushed Corduroy Distress Crack Paint, but did NOT like how it turned out, so after it dried, I just added some gold Alcohol Ink Mixative.  Perfect!!!

Here is a list of the products I used:
Paper:  Classic Chic paper from Basic Grey Little Black Dress Collection
Scroll Gaffer Tape: 7 Gypsies
Wooden Hanging: KaiserCraft Flourish Pack - Hanging Plaques
402 Sticker:  Tim Holtz Idea-ology - Crowded Attic Salvage Stickers
Knob:  Tim Holtz Idea-ology - Curio Knobs

See you soon!

Linda

Saturday, February 25, 2012

Celebration of Mom

Today's post is near and dear to my heart.  It's all about my mom.   She's 76 and going strong.  Seems young as ever and still the party girl.

The pictures represent moments from her life from a little girl on the farm, to a teenager, marriage to my dad, the rugrats when we were little, a picture of her and my dad on their 50th wedding anniversary, and the whole family on our trip to the Outer Banks to celebrate.  Good times!   They'll be married 56 years this year!! :)

I used the Artist Printer's tray from 7 Gypsies.  Here is a picture of the whole tray.  There's a bit of a glare in places.  It was hard to get a good picture without glare.


Pin It
The papers I used were from the Bo Bunny Gabrielle Collection.  I used a lot of other products as well.  Here's a close up of each section.
The jewels are from Prima, the heart die is Tim Holt'z Alterations Mini Hearts Set, the seam binding ribbon was dyed using Ranger Perfect Pearls Mist in Blue Patina, Green Patina, and Brushed Corduroy Distress Ink.

The charm is made up of 7 Gypsies Loop & Hook and Tim Holtz Idea-ology Baubles, Muse Tokens, and Locket Keys. The mini spools and fabric flowers are Maya Road.  The dress form is Tim Holtz Alterations Sizzix die Mini Sewing Room.  I also use Tim Holtz Alterations Ornate On the Edge die.  The hanger clip is Tim Holtz Idea-ology.

The butterfly is a Martha Stewart Punch.  The "angel mother" quote I typed.  It's a quote from Abraham Lincoln that I love.  The satin flower is Bo Bunny.  In the lower left, the stamp is Tim Holtz for Stamper's Anonymous, the handle is 7 Gypsies.  This  panel opens up to reveal "Keep an adventurous heart." which is from Stamper's Anonymous.  The lower right is made up of dyed ribbons, the little flowers are from Maya Road and I died them with Perfect Pearls Mist in Blue Patina and Ranger Peach Bellini Alcohol Ink.  The brown ric rac is Maya Road and the button is a vintage button I picked up along my journeys.  The vials are Tim Holtz Idea-ology.
In the upper right, the butterfly dies are from Memory Box.  Love them!  The quote say "When I want to see love defined, I look at you." It's from Tim Holtz for Stamper's Anonymous.  The ric rac die is from My Favorite Things.  The rosette and bird dies are from Memory Box.  In the last frame, the stamp saying is from Verses and the butterfly images are a Martha Stewart punch. 
Sorry for such a long post today.  But, I hope you enjoyed.  Talk to you soon.

Linda

Sunday, December 4, 2011

Christmas Wall Hanging

In today's post, I'm featuring another project I created for display at The Scrapbooking Studio in Bloomington, IL. 

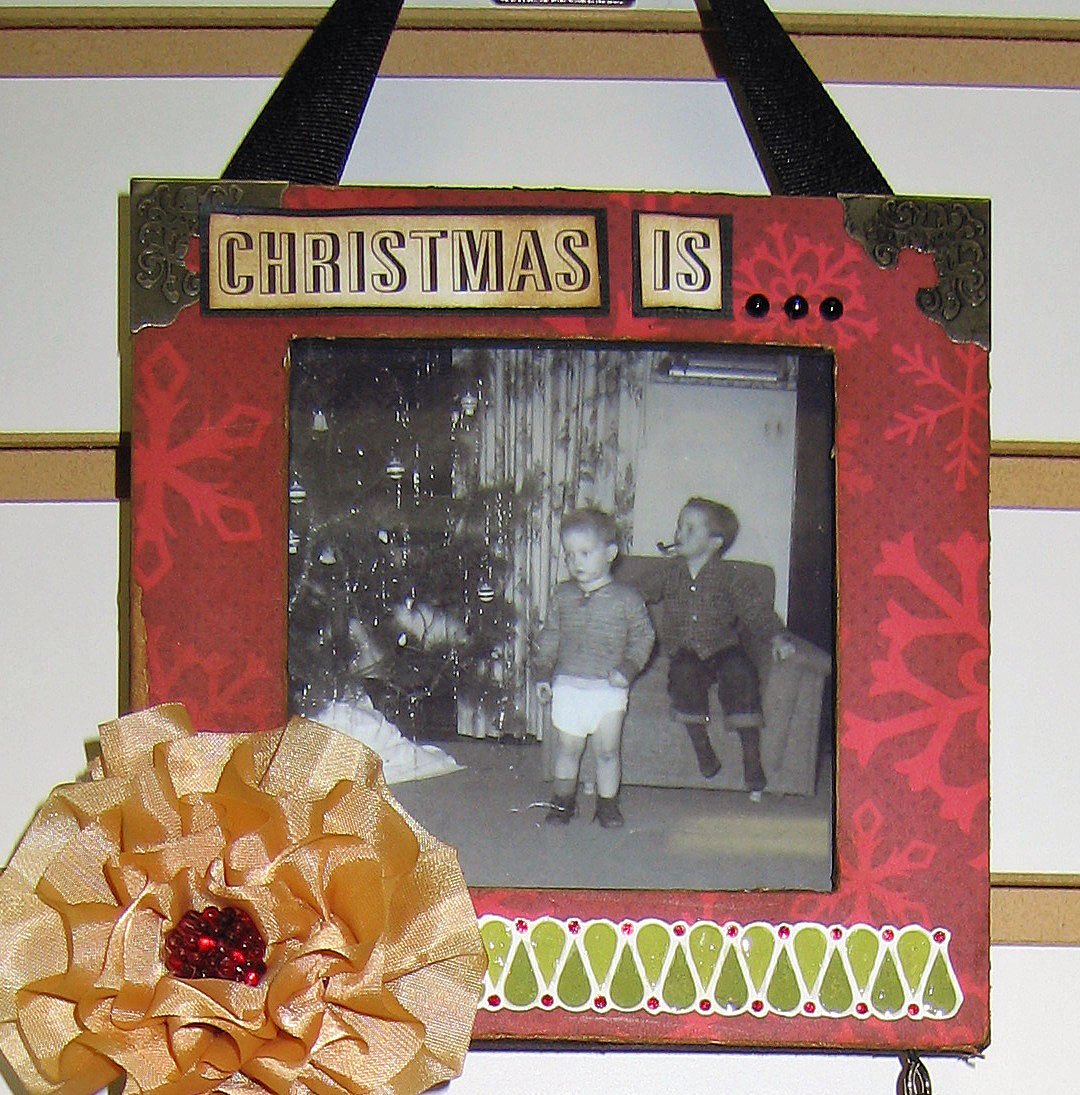
I love looking through my mom's old picture album when she and my dad first started their family.  The photos I used here are of my brothers at Christmas time 1961.  My parents never did have a lot of money, but they made up for it in love and filled our home with happiness.

I'm featuring papers from Echo Park Season's Greetings Collection.  But you'll see pieces and parts from many of my favorite designers and companies including Maya Road, Ranger, Tim Holtz, and Kaiser Craft.
Here's the entire wall hanging.  The frame is just a cheap bare wood frame that I bought a few years ago. I think I got it at one of the big chain hobby stores.   I painted it with black acrylic paint.  I cut Echo Park Ornaments paper the size of each frame and then distressed each piece with a paper distressing tool and distressed with Brushed Corduroy Distress Ink.  I glued each piece to one of the frames and then used an Exacto knife to cut out the center.  Finally, I took sand paper and gave all the edges a worn look and distressed again with Brushed Corduroy Distress Ink. 
For the words on each frame, I actually cut the phrase from a piece of Seasons Greetings Borders paper.   Here are the details of each frame.
I used Tim Holtz Idea-ology Metal Corners.  The green strip at the bottom is cut from the Echo Park Season's Greetings Borders paper.  I added Glossy Accents over the green and Christmas Red Stickles over the red dots.  No project is complete without Stickles! :)  The flower I made from Maya Road Satin Pleat Edging in Golden Yellow.  It's super easy to make.  Just follow the instructions in this video.  The center of the flower is a clear Raspberry Bead from Maya Road that I colored with Alcohol Inks....or you could use Copic Refill.

Here's the second frame:
The background paper is cut from a sheet of Echo Park Season's Greetings Christmas Ads paper.  I just distressed it slightly with Antique Linen Distress Ink.  I cut one of the cards from the Journaling Cards paper and adhered it to a piece cut from the reverse side of the Christmas Ads paper.   The list of toys are actually toys from the 1961 era.  In fact, I'm pretty sure my oldest brother received the Handy Andy Tool Set which contained REAL miniature sized tools for kids.  There's a large chunk out of a concrete pole in my parent's basement as proof they really worked!

The vintage wood snowflakes are from Maya Road and I just distressed them with Brushed Corduroy Distress Ink and added a red rhinestone to the center.  The tree, I die cut out of Grunge Paper using Sizzix Tim Holtz Snow Tree die.  I cut a second tree out of the reverse side of the Echo Park Poinsettias paper and distressed it with Antique Linen Distress Ink and adhered it to the Grunge Paper tree.  I just added a bit of Star Dust Stickles to the swirls on the tree.

Finally, the third frame...
Again, I added the metal corners from Tim Holtz.  The wood curl is from Kaisercraft.  I just colored it black with a Sharpie and then covered with Diamond Stickles.  The stickles are clear until you use them on a dark background.  I didn't even realize they would come out this yellowish green!  The metal charm is from the Tim Holtz Idea-ology Christmas Adornment pack.  I colored the holly and ribbon with Copic markers.

Sorry for such a long explanation!  The best part is that all of the supplies to make this project are available at The Scrapbooking Studio in Bloomington or Moline, IL!

Talk to you soon!

Linda